RSN Silk Shading: WIP

The final module for the RSN certificate!

Tight brief here: design has to be a flower, fruit or vegetable and has to feature a turning leaf…. Having seriously considered several humorously phallic carrots, I settled on this satusuma for my design.

Taken between February 2019 and January 2020, the following photostream charts the first half of the project. Starting with pricking and puncing to transfer the design to the silk, stitching a shade key and testing out a circle shape, stitching the lower half of the fruit and the furthest leaf.

silk shading | orange | satsuma | RSN | Sarah Mole

silk shading | orange | satsuma | RSN | Sarah Mole

silk shading | orange | satsuma | RSN | Sarah Mole

silk shading | orange | satsuma | RSN | Sarah Mole

silk shading | orange | satsuma | RSN | Sarah Mole

silk shading | orange | satsuma | RSN | Sarah Mole

silk-shading-sarah-mole-RSN-7

silk shading | orange | satsuma | RSN | Sarah Mole

silk shading | orange | satsuma | RSN | Sarah Mole

silk shading | orange | satsuma | RSN | Sarah Mole

silk shading | orange | satsuma | RSN | Sarah Mole

I actually really enjoy this technique! The long and short stitch creates a lovely effect and I’m having fun creating painterly shading.

What I’m not loving is replicating a photograph. I’m finding it frustrating that I’m not managing to achieve a photorealistic result, although in truth I don’t think that’s really the aim of the exercise here. I’m super happy with the smooth, round edges, and I think once I get to the light-reflection part it’ll suddenly feel more ball-like.

I’d really like to try this technique in a more modern, abstract design – just playing with geometric shapes and colour would be fun.

Goldwork: RSN certificate module 3

Finally, blackwork is done and I’m moving on! My finished blackwork piece is in for assessment over Easter, but I’ll post a proper conclusion on that whole thing once I get it back.

For now I’ll do a little walk through of the starting steps on the next project: goldwork. The design I’ve gone for is a goldfish, for obvious reasons. Given that I have literally zero understanding of this technique and the elements I need to include the designing part has been a bit of a head fuck, but I think I’m actually super happy with the direction the tutors have helped me take here.


The prep is quite long for this technique. For a start, framing up has the added kerfuffle of attaching the silk to calico with a herringbone stitch.

And then the transfer of design is done by pricking and pouncing, which I’m not a massive fan of. Stabbing all the tiny holes in the tracing paper is fun, but then I made a bit of a balls up of tapping the chalk through the holes onto the silk.

Never mind though, it brushes off. After painting the lines in with white watercolour and an insanely thin brush I could deal with the chalk debacle pretty easily.

The silk then has to be fixed to the backing calico with tiny stab stitches; all over in the filled area and only along the lines in the open areas. Giving poor little fish guy the pitiful look of a child with chicken pox.


Now some padding can be done! The body part of the design needs to transferred to felt in the same way as the main design, and cut out several times to make pieces of decreasing size. These will build up the padding for the fish body and give him a subtle 3D effect.

They’re attached smallest first and biggest last, to make the finished shape as smooth as possible.


I’ll also need to complete a area of soft string padding to meet the brief, so that section of my design will be the crest-y bit. String is waxed and doubled up over and over to create the perfect thickness to fill the shape. Working from the centre out, one gradually removes chunks of string from the fabric side of the bunch until only a couple of strands make it right out to the end.


The finished shape is (hopefully) a smooth, elegant curve, which will get covered with lines of gold at a 45 degree angle.


One of his fins didn’t cut the mustard, so I’ve removed that and will need to add a new piece for homework. But still, I feel like I’ve made a good start!

Assessment results: Jacobean Crewelwork

This is the first module of four that make up the certificate course at the Royal School of Needlework, and my piece is now assessed and framed.

IMG_9038

I did well! I think. Although how can you tell when you’ve not got a class full of peers to compare yourself too? I wouldn’t say I’m competitive, but I do like to know how everyone else has done. And maybe also rest assured that I kicked their arses.

The course works on a very flexible system of attendance, so although there are a dozen other students in the classroom with me on any given day, they could be working on any one of the ten modules covered by the Certificate and Diploma courses. We’ll all have started at different time, we’ll all be at different stages, and we’ll all pick up our results discreetly and mostly without discussion.

I scored (is that the right word?!) 87 out of 109. Which is basically 80% and where I come from that’s a 1st! A grade which I think I only achieved once during my BA, for an essay on postmodernism which has been less help to me than algebra over the intervening real-world years.

I got full marks for several areas, including taking care of my fabric, use of colour, smooth outline stitches and sharp points. Apparently my burden stitch on a curve was very brave. My lowest marks came from not including enough open areas and also the quality of my slip stitching on the reverse of the mount. Not going to lose sleep over those!

IMG_9040

The feedback did hammer home that this is not some arty-farty, high faluting, conceptual Saint Martins’ course… This is a technical course in traditional hand embroidery techniques, with more than a passing care for their historical context. And I am a geek for that stuff, a pedant of the first water who will research meticulously to understand and articulate the era at hand; but even I was docked marks for elements of my design showing ‘a modern interpretation which sits outside the brief’. I do like that, although being a rebel at the RSN is being a moderately sized fish in a very tiny pond.

They concluded that my concept was unusual and my finished piece striking, so that’s nice.

Choosing a frame proved tricky. Maybe the assessors were right and the slightly contemporary twist on a generally historical feeling piece left us finding that no style of frame really felt right. Not only that, but it also needed to reflect my taste as maker and my mums’ taste as future owner and viewer. We were in the frame shop for a very long time. We had to go for full English breakfast afterward to recover.

IMG_9047

I think the final choice was alright though, and it does seem at home in my mum’s living room despite a slight clash with a jammie dodger cushion. Not that it was cheap! A hundred and fifty quid to get something framed – is that normal?! I suppose when you consider that this module of the course cost me well over a grand in fees, plus a bit more in materials and transportation, and easily a hundred hours of my life; the cost of the frame is a piss in the ocean.

I am well into the to blackwork now, four classes in to the eight class unit. I’m going to work a bit more intensively on this one, I worried about the fabric being stretched for a full year while I completed the Jacobean and although there were no visible effects on the finished work I think it’s generally better to avoid the excessive strain. The rest of my dates are booked in the diary, so if I can stay on track I’ll be putting the finishing touches to it in 2 months time.

Blackwork: RSN Embroidery Certificate Course, module 2

My last class marked the halfway point on this module. Four down and four to go, but I can’t say it looks like it’s half done.

modern blackwork embroidery portrait

The shading is really daunting. The two elements of thickness of thread and density of stitch pattern have to work simultaneously to make the overall shade move from dark to light and vice- versa. It feels like a strange combination of calculation and instinct. At the beginning I experimented with the threads and set out a key for which looked darker than the next, setting them on a scale from 0-8. I traced my design into blocked out areas of shade and allocated each area a value corresponding to my scale, so that similar tones would look even across the whole piece. At which point I felt that this would be manageable, like a paint by numbers…

Blackwork embroidery shading plan

But I have to use around 5 different stitch patterns within this design, some more open than others. So even though a 4 on my scale may mean using 3 strands of Anchor cotton, that is going to look different in each of my stitches and 3 strands of cotton on the figures’ legs may look much darker from a distance than the same thread on the wall behind her. To compensate for this I need to adapt the stitch pattern to either add or remove some stitches and adjust the density of the stitch. Or, if I want to keep the stitch the same for design purposes, I’ll need to deviate from the key and use a different thread to achieve the right shade.

IMG_8823

The whole thing is a balancing act, constantly juggling stitch with thread and comparing the developing work with the original image. I’m paranoid about making the background too dark or too light, throwing in the blackest black where it should be a mid tone and leaving myself with no darker tone for the shoes or the gloves.

IMG_8888

Take the area that I’ve worked on today for example: the upper left side of the background where the light moves from bright to very dark in the shadow of the models’ arm. The changes in tone are so varied! and in trying to incorporate every little undulation in shade I’m not only losing shape, but losing the relationship between the arm shadow and the top right corner of the image. Is this a problem? I haven’t got a clue.

blackwork embroidery shading backstitch pattern

But, as important as it is to follow the photograph, I also want to have the freedom to decide what’s best for the embroidery as a stand-alone piece. After all, once it’s done no-one will view the two together, and the embroidery has to work as a realistic and well composed image. It’s inevitably going to be stylised to a certain extent – it’s a textile piece and not a photograph – but it has to make sense and if the lighting in the image is illogical then the brain of the viewer will be quick to flag it up.

IMG_8872

And to add to the difficulties, winters limited daylight hours are putting the pressure on! I set up shop in front of our big bedroom windows and door to work a few afternoon hours this weekend, but before long the natural light goes and my harsh lightbulbs don’t cut the mustard.

Completed embroidery! Jacobean Crewelwork at the Royal School of Needlework

I finished module 1! It took a year, but that’s no bad thing seeing as I can’t afford to do this course any faster. At a grand per module I’d be crazy not to take my time.

I had to use up a little of my first class of the next module just to get the mounting done, but that doesn’t seem to matter. The mounting is meticulous, involving cutting board to size, covering it with calico (glued down on the reverse), pulling the work taut over the board and herringbone stitching it to the calico, then carefully slip stitching a piece of cotton sateen over the ugly bits.

General opinion on mounting seemed to be one of passionate hatred, but to be honest I really didn’t mind doing it at all! It does take a while, but then so does the stitching and at the end of the day I’m there for the express purpose of doing lengthy, hands-on tasks. (Apparently assessment is very strict on this element though, so I might be humming a different tune when I’ve been marked down for not smoothing my pin holes to complete invisibility, or some other trifle.)

mount board with glued calico and herringbone stitched exbroidery piece

slip stitching sateen to finish the mounting

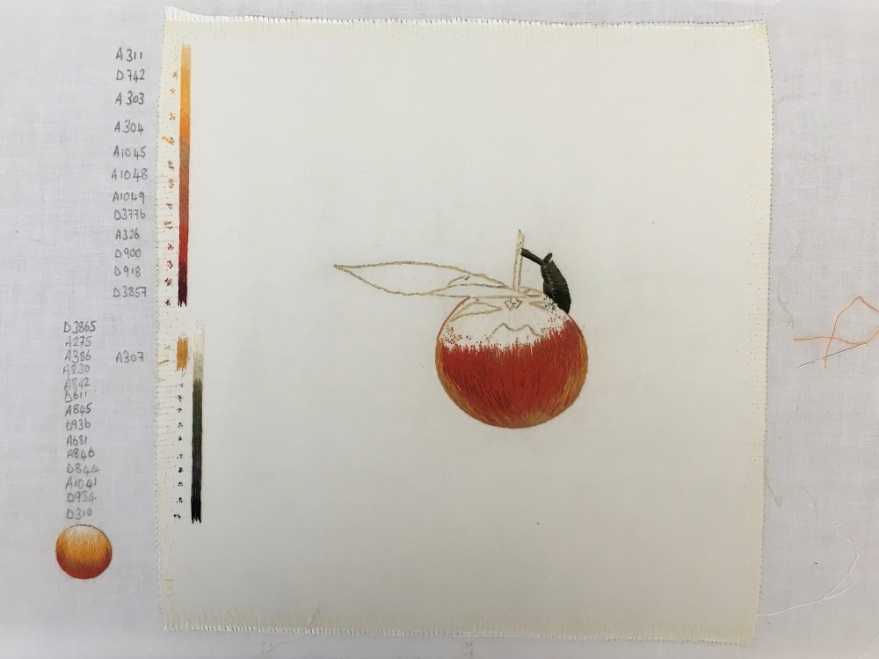
In general I’m pleased with the finished product. No, the design isn’t what I’d have gone for given a totally free reign, but the brief was very tight and I do think I’ve managed to maintain at least a little of my own style.

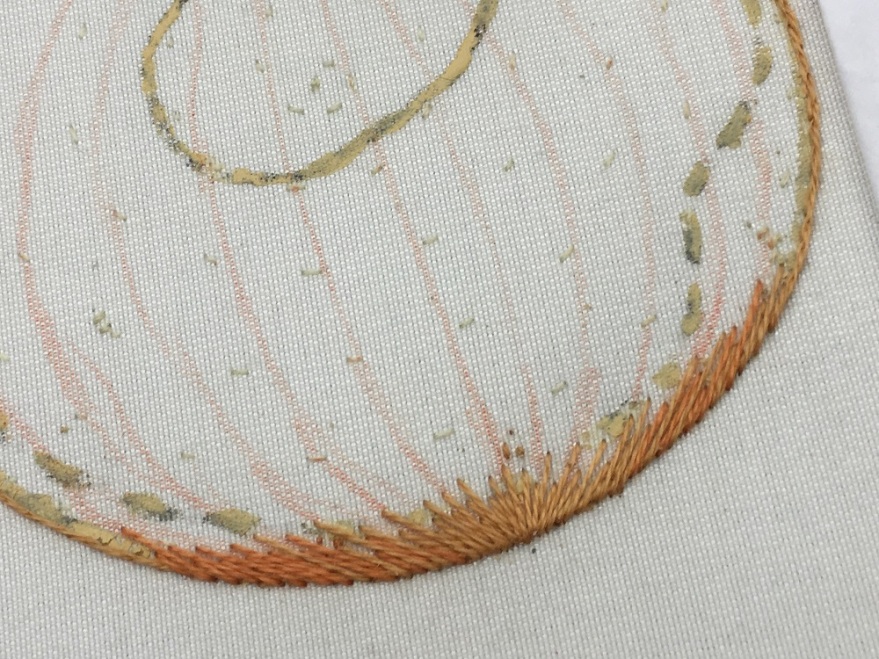
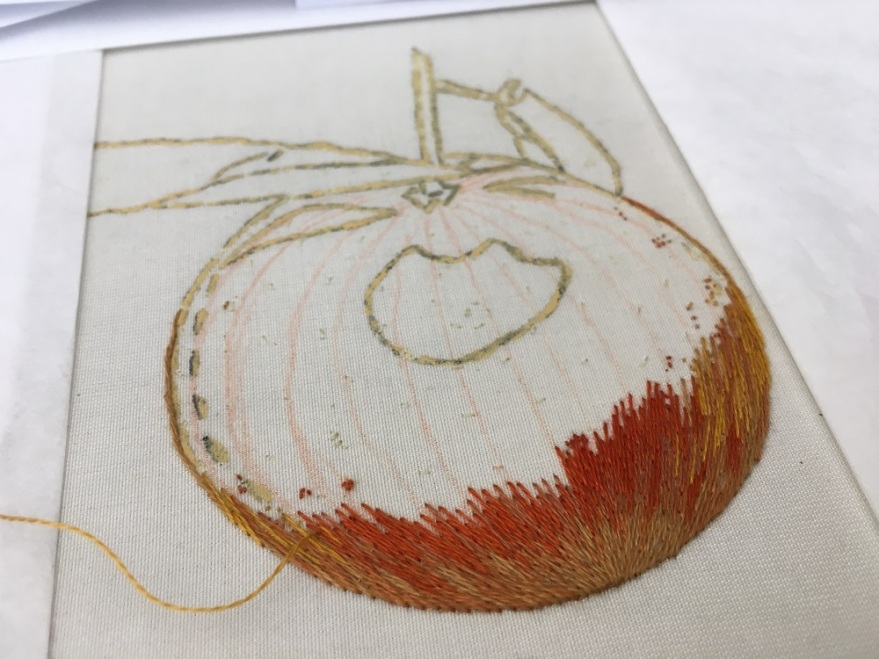
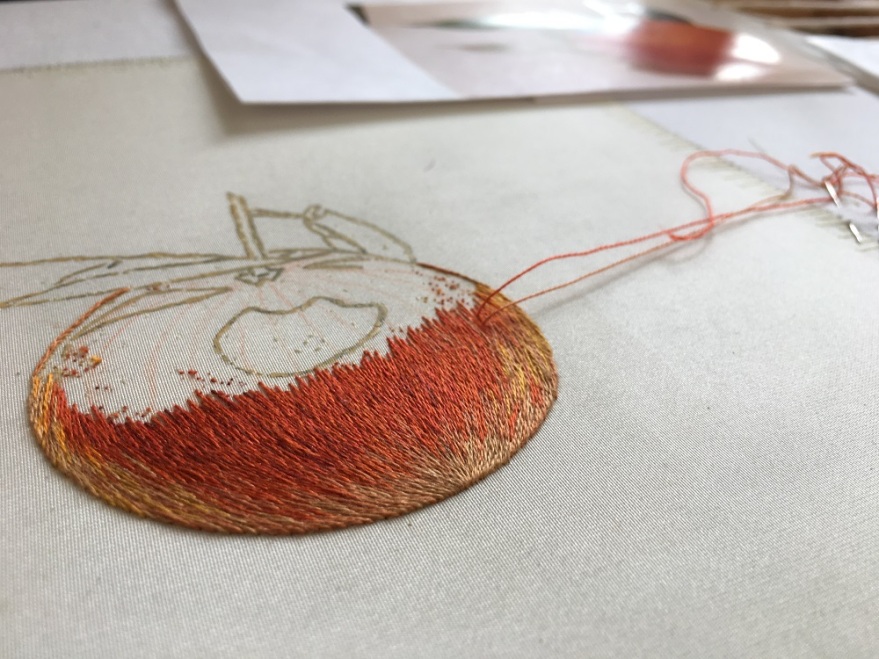
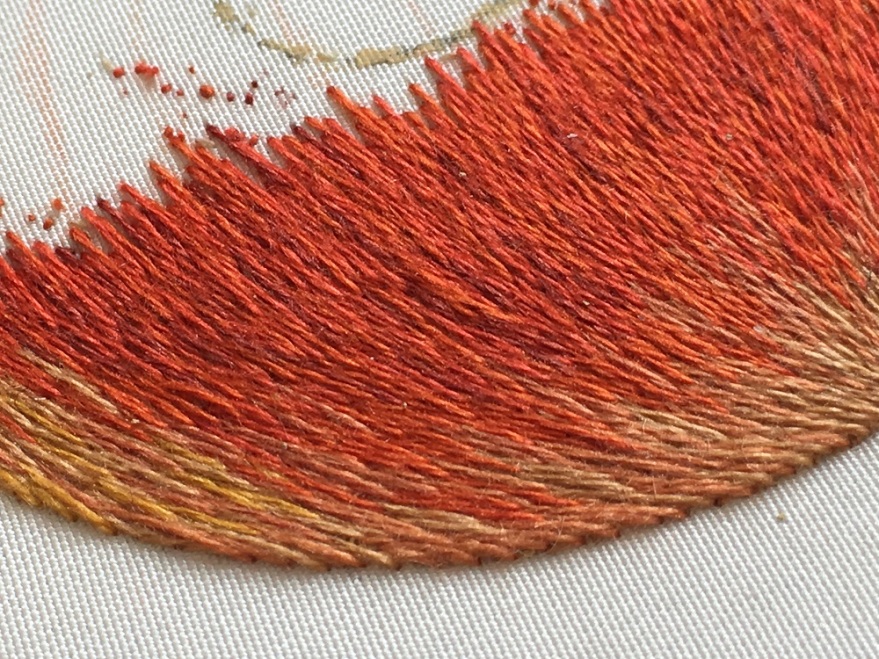
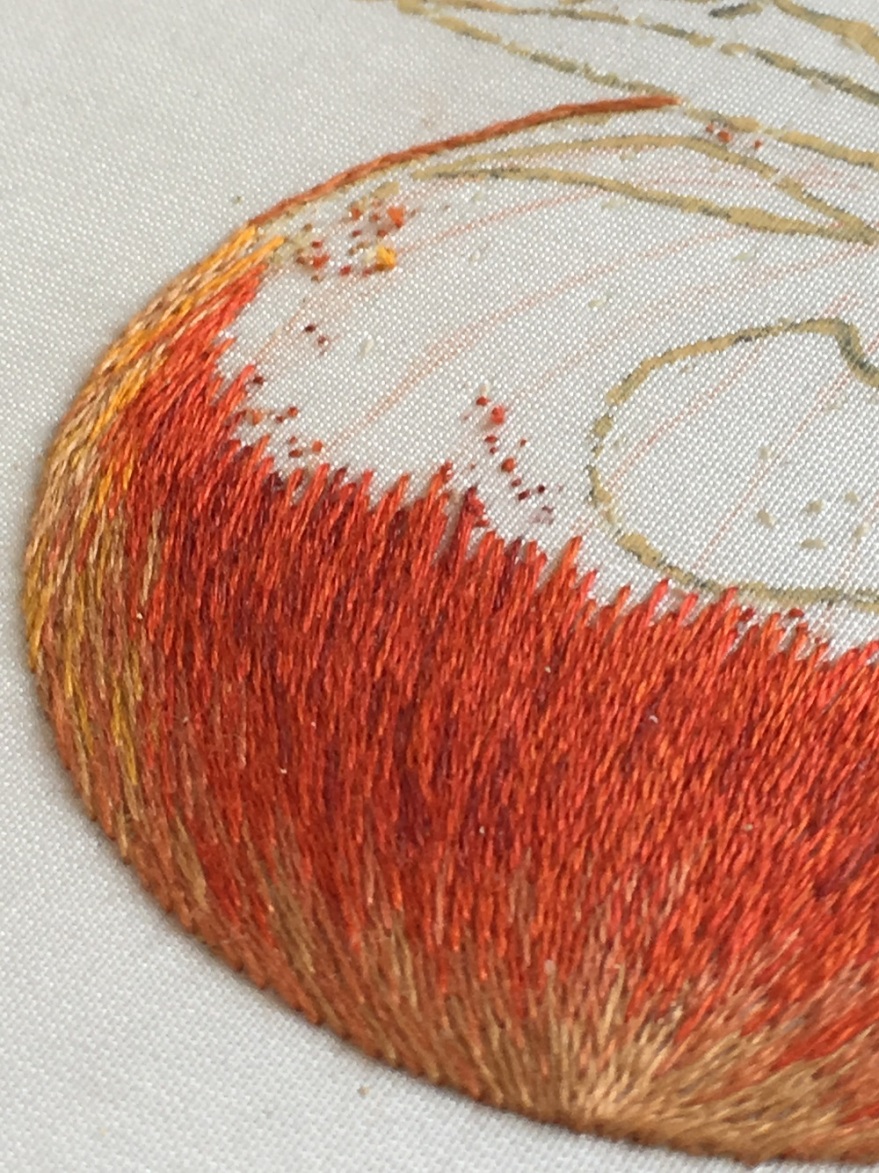
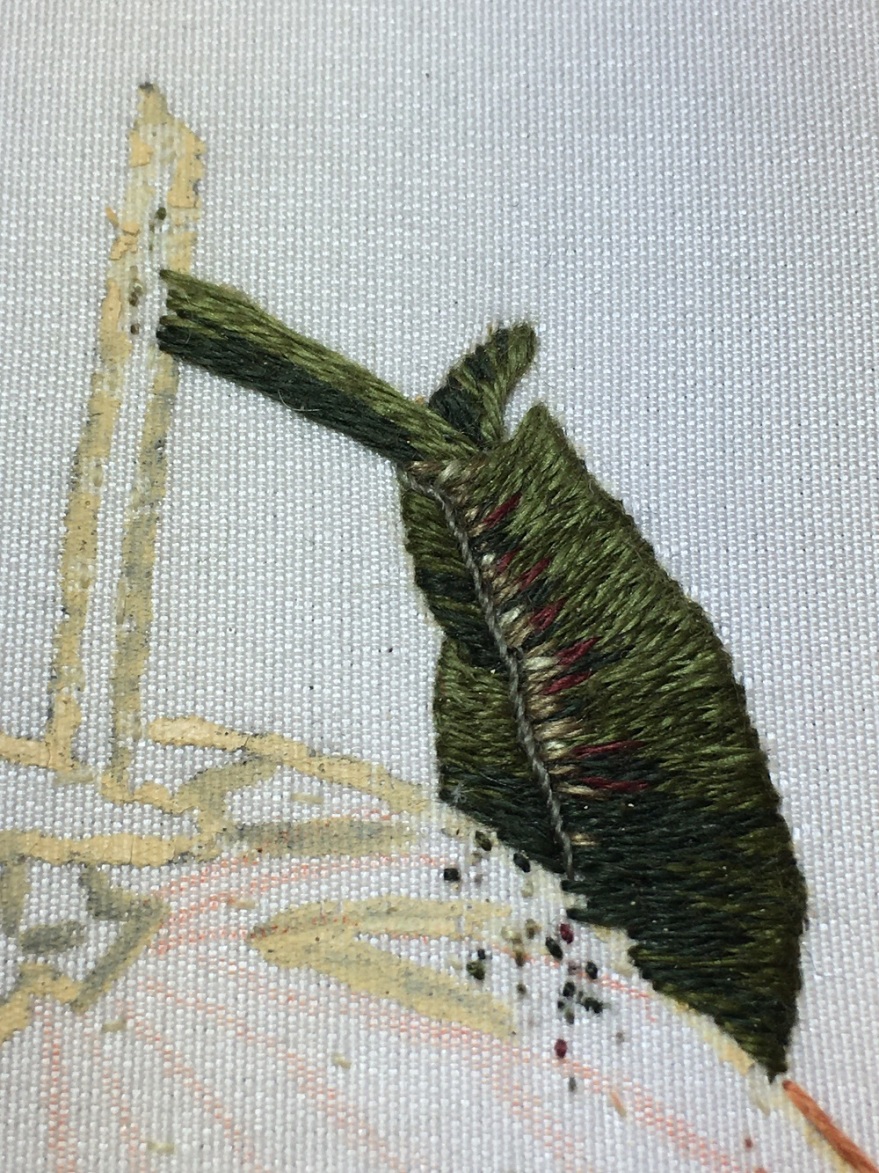
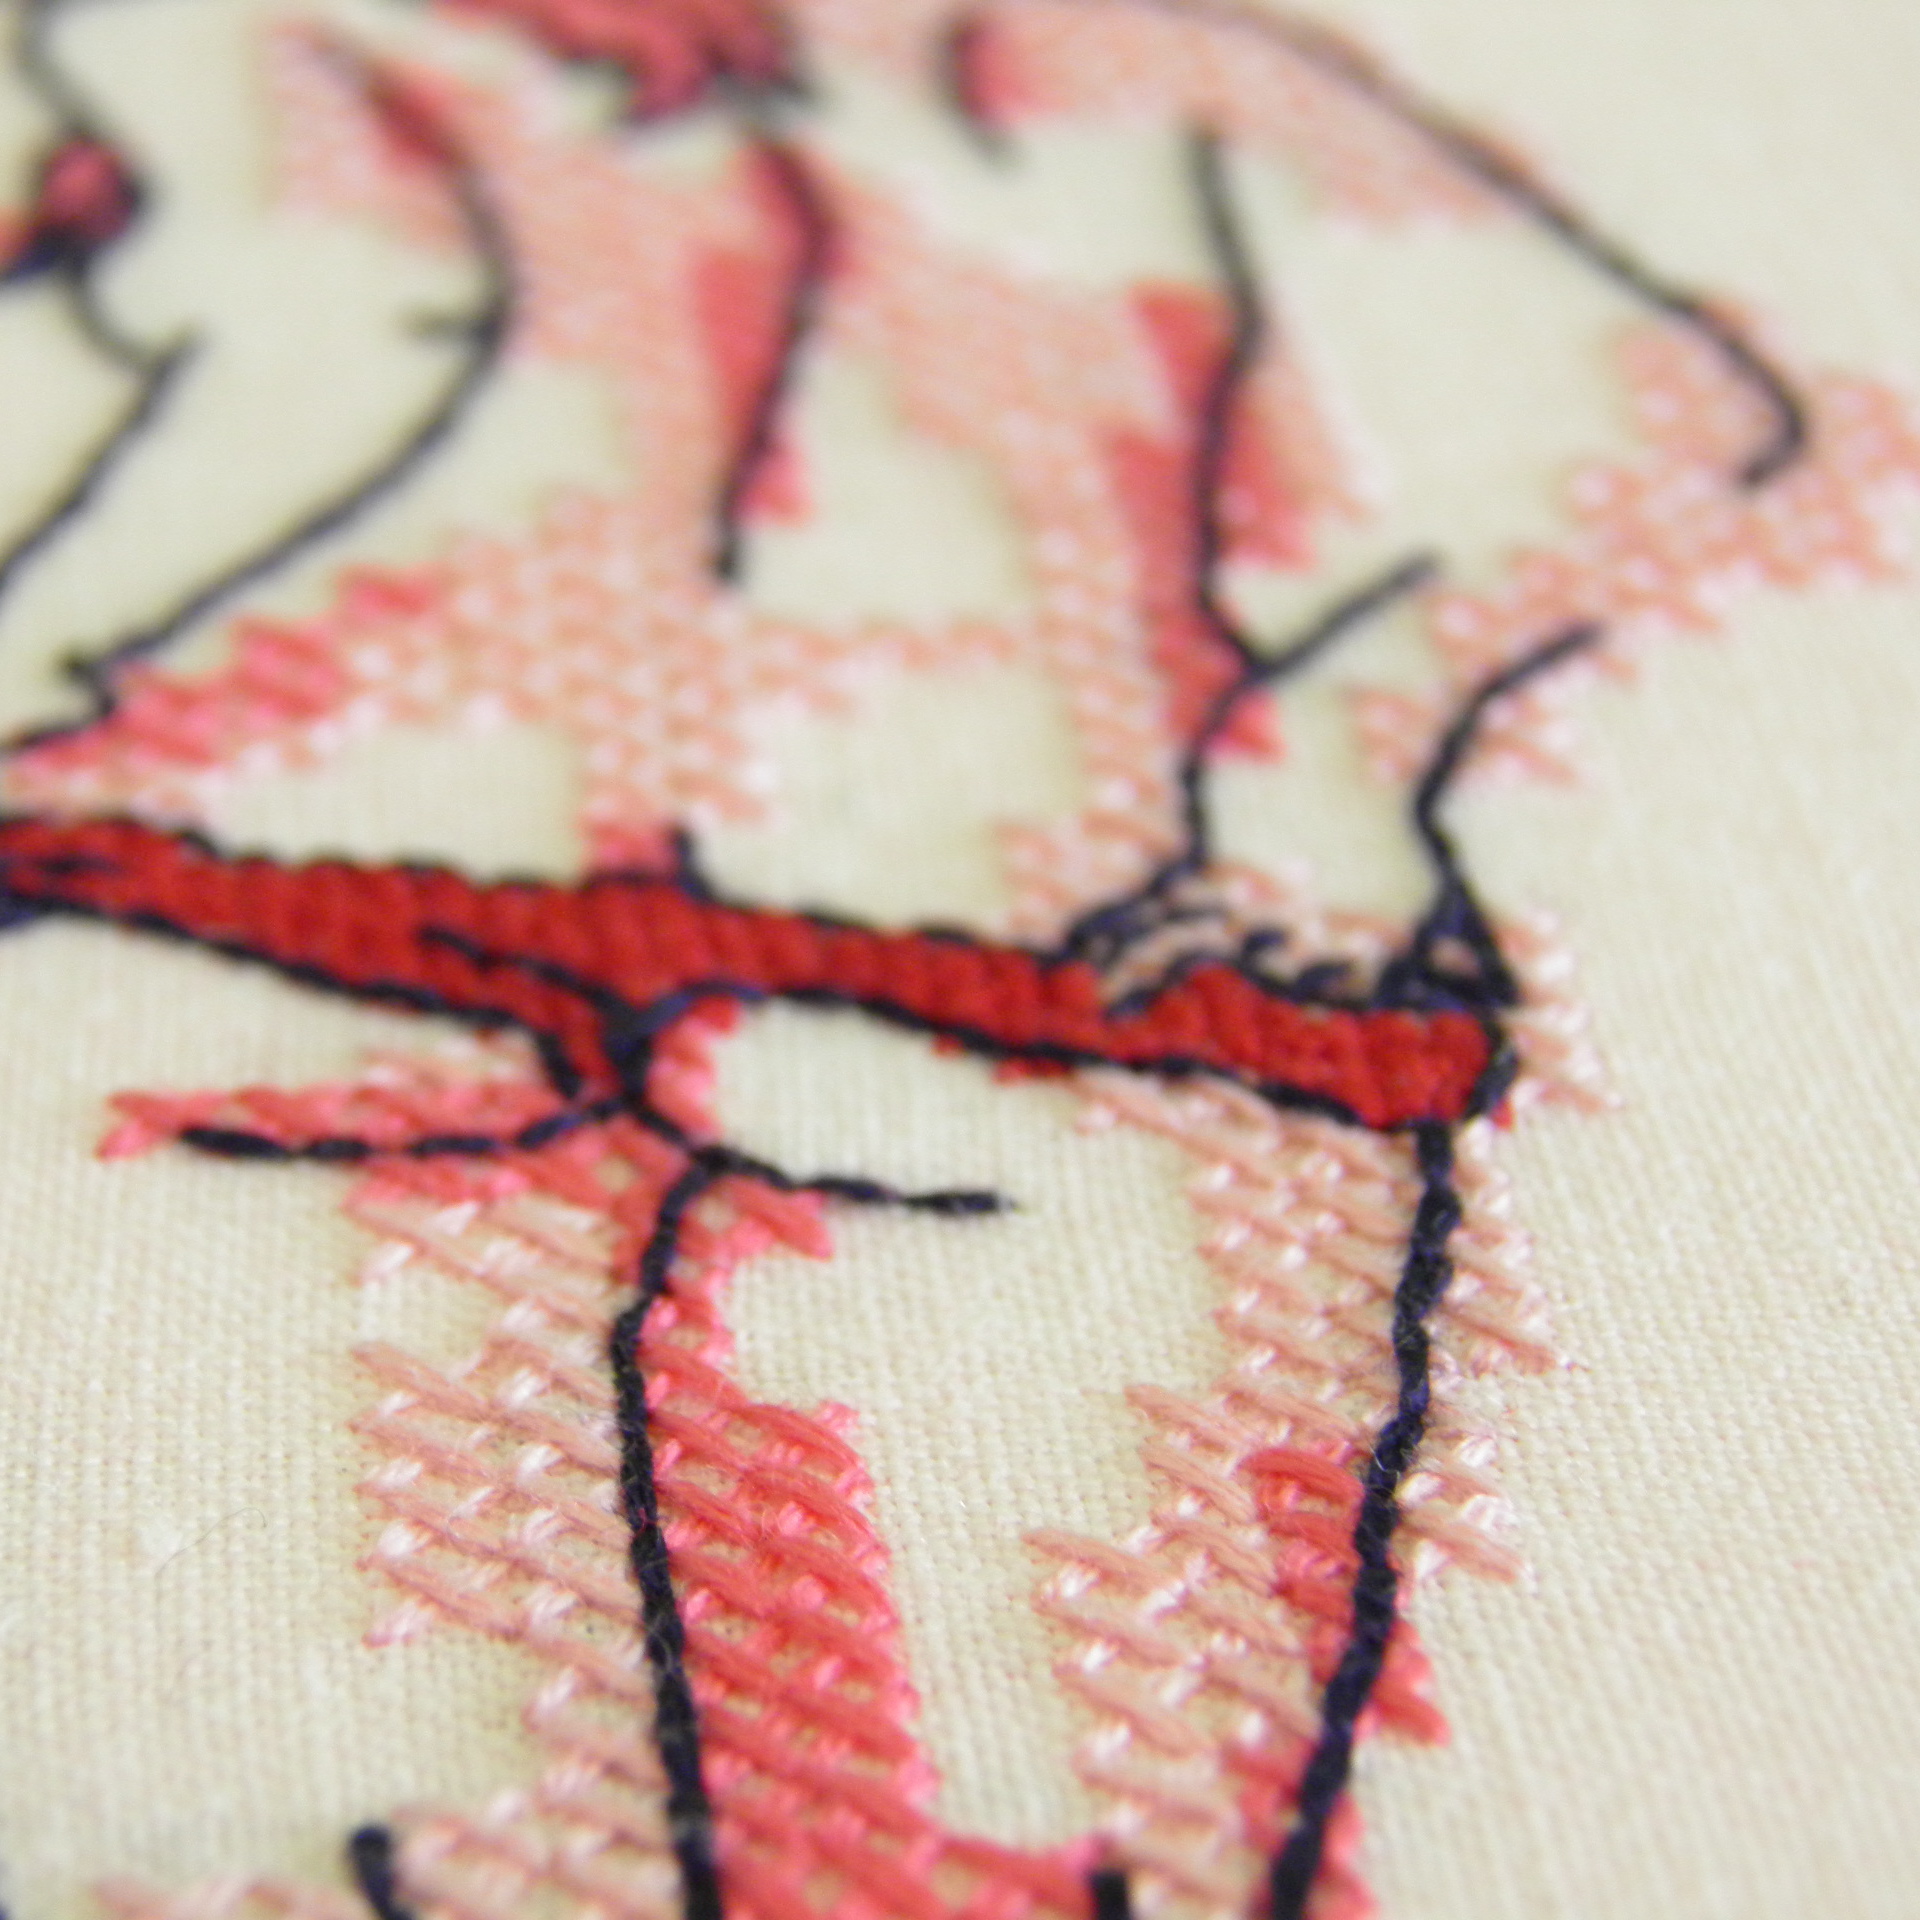
Below are some closer detail photos with a brief description of the stitches shown…

jacobean crewelwork monkey

Padded satin monkey, with whipped backstitch feet, long and short face, bullion knot ears, turkey rug hair and a bunch of french knot grapes. Upper part of the trunk is in burden stitch, lower part is chain.

jacobean crewelwork monkey tail

Pearl stitch monkey tail, with chain stitch and burden trunk sections.

jacobean crewelwork berry

Long and short leaves at the top of the berry, laid work inside, outlined with couching.

jacobean crewelwork berry detail

Laidwork, long and short and couching.

IMG_jacobean crewelwork big grapes

Whipped and woven wheel grapes, stem stitch vine and french knot stump top.

jacobean crewelwork grapes

Chain stitch vines, french knot grapes, chain and burden stitch trunk sections.

jacobean crewelwork trunk

Lower left section of trunk is block shading, central section is heavy chain, regular chain on the right side. Raised stem band vine. Stem stitch and french knots in the trunk detail.

jacobean crewelwork leaf

jacobean crewelwork leaf detail

Outer leaf with stem stitch outline, running stitch and french knots at edge. Van Dyke, cretan and fishbone teardrops inside, filled with seed stitch. Inner area in trellis with contrasting pips.Buttonhole stitch at top.

All these new stitches have been really inspiring and I definitely want to make more interesting personal projects now. I’ve already made a tropically-themed felt brooch for the office summer party which made it clear how this course has given my stuff a real boost! I love seeing contemporary crafters, and artists for that matter, using embroidery to produce subversive and modern work, but nine times out of ten I’m disappointed by the naivety of the craftsmanship – just because something’s witty doesn’t mean it can’t be well founded. If there’s one thing I’ll be taking away from this it’s that the supposedly dying art of traditional embroidery can be enormously versatile and it’s a shame that so many young and enthused crafters are peaking at a cross-stitch with a bit a swearing in it. Push the envelope guys! Throw a bit of Van Dyke in there :)

embroidered felt brooch, Lilt coctail can

More crewelwork – class 6 of 8

I’m six days in to the eight day module. Still really enjoying myself :) and yeah, I have done so much sewing that my fingernails hurt, but as I wandered back towards the palace after getting my lunch, stuffing a brilliant mozzarella and chorizo panini in my face and revelling in the February sunshine, I thought ‘fucking hell, this is better than being at work’.

Today I have done three new stitches for three big sections, which is great because I really need to make strides here! I finished off the laid work section for the berry-thing on the right hand side, so I could move on to the long-and-short for the top sections (…sepals, possibly?! I did biology A-level, believe it or not! I’m sure I have more plant knowledge than I’m currently using). Long-and-short was really tough, by far the hardest bit so far, but I’m quite pleased with the results…

Split stitch outline on the external lines of the area: long and short embroidery split stitch

Long and short stitches in the darkest shade: long and short crewelwork embroidery

Additional rows in graduating lighter shades: crewelwork shading with wool

Moving on to the next section, working from background forward: petal shading embroidery wool

And it’s current state! After the centre section I’ll add the lightest pink shade to the top: long and short stitch embroidery

After that I covered the big trellis section on the left hand side, which is super satisfying in both speed and geometry. It’s a double grid with little circles to anchor it which I’m calling ‘pips’ although I’m not sure that’s the official term. Stages as follows… First lines, along the direction of the twill: trellis stitching first layer

Second lines, at right angles to the first, at a distance to make perfect squares: trellis stitching second layer

Third and fourth layers, in a darker shade, crossing every other row of diamonds already laid down: trellis stitching top layers

And finally the pips, little circles running under the first layers and over the top ones to pull the lighter shade to the front: trellis embroidery stitch with pips

And to finish the day I did the first of 9 wheels, which will form a bunch of grapes at the bottom left of the design. These will be shaded within each wheel, and also gradually get lighter towards the bottom of the bunch… woven wheel crewel embroidery

And so this is the current state! Lots more to get through but it’s coming on…

jacobean crewelwork royal school of needlework certificate day 6

Tattooed unicorn and jacobean crewelwork day 3

Made some more progress in the third day of the certificate course at the RSN. Learnt two new stitches – heavy chain…

heavy chain embroidery stitch


(unfortunately hard to see in the dark colour!)

and raised stem band…

raised stem band embroidery stitch


raised stem band crewel embroidery

So currently the Tree of Life is up to this stage…

RSN jacobean crewelwork tree of life - day 3

Still a very long way to go! And a long list of homework to tackle before next month.


And in the mean time I have been practicing my embroidery skills on the unicorn I crocheted recently. I think he looks good for it! The back stitch I started out using turned out to be far too thin, I needed the stronger stem stitch to make a decent line. Would also like to make him a little shirt with rolled up sleeves.

If you’re interested in making your own, I used the Toft Alpaca pattern for the zebra, from Edwards Menagerie, and then added my own style of horn and mane. Their pattern base is great and very versatile – really easy to personalise into pretty much any creature you like.

embroidered tattoo unicorn - left embroidered tattooed unicorn - front embroidery tattooed unicorn - right

I feel like you don’t see enough masculine unicorns. Maybe that’s where they went wrong.

Jacobean Crewelwork – day 2

Progress from the second day of the certificate course at the Royal school of Needlework!

Today I have finished framing up, pounced and painted the design onto the fabric, had my stitch plan critiqued and improved, and started the actual stitching :) Almost three weeks until my next class in which I need to complete the chain and block shading stitches I’ve started, plus begin a heavy chain stitch area, and test out some trellis suggestions on some scrap fabric.

slate frame embroidery RSN certificate course


painting on jacobean embroidery design

crewel embroidery chain stitch

crewel embroidery block shading stitch

royal school of needlework certificate course jacobean crewelwork day 2


Beginning at the Royal School of Needlework

So I’m really properly on at the RSN now! Had my first day last week and loved it. Shame I look like a muppet in my 2year-long security pass, but never mind!

RSN pass

So here’s where I’m at so far –

The design is finalised, following a bit of sketchbook research and doodling:

sketchbook work, Liberty's    sketchbook work, Hatfield House

sketchbook progress at RSN

Jacobean Crewelwork design

The design has been copied to tracing paper and then all the lines have been perforated, this will form a template for painting the design to the fabric next time around:

pricked embroidery template

I’ve started to set up my frame, but can’t finish that until my next class, so in the mean time I’ve been experimenting with stitches, using the actual colours of wool which I’ve chosen:

colour palate, appletons crewel wools  french knots with shading, mustard to rose  woven wheel with shading, teal  chain sticth and stem stitch with shading, dark teals and roses


I’m really into it! It’s very traditional, and in a way that feels a little pointless to me, but the experience and the skills are fantastic. So glad I enrolled for it! One day down, four years to go…

Hampton Court Palace